
Cooking Recipes

INGREDIENTS
⅓ cup neutral oil
1 bay leaf
1 black cardamom
4 cloves
½ inch cinnamon stick
1 large yellow onion thinly sliced in half rings
1 tablespoon ginger and garlic paste
2 to 4 bird's eye chilies or to taste sliced lengthwise
½ teaspoon turmeric powder
1 teaspoon cumin powder
2 teaspoon coriander powder
1 teaspoon red chili powder
1 pound ground beef
1 ¼ teaspoon salt or to taste
1 cup full-fat yogurt whisked and brought to room temperature
INSTRUCTIONS
Heat oil in a heavy bottom pot. Once it begins to shimmer, add whole spices (bay leaf, black cardamom, cloves and cinnamon stick) and fry on medium to medium-low heat for 30 seconds or until fragrant.
Add onions and sauté until evenly brown for 7 to 12 minutes.
Add crushed ginger and garlic and fry for 30 seconds. Take care not to let it burn. Stir in green chilies.
Add ground spices (turmeric, coriander, cumin and red chili powder) fry for 1 minute. Deglaze the pan with a splash of water (1 tablespoon at a time) if and as needed.
Increase heat to medium to medium high, and add ground beef and salt. Crumble with wooden spatula and fry until no longer pink, about 5 minutes.
Add ½ cup room temperature water and bring to a simmer. Lower heat, cover and let the beef cook for 30 minutes. Stir occasionally to make sure it doesn't stick to the bottom of the pan. Once done, remove cover and let it simmer to boil out any excess moisture. Check for salt and adjust as needed.
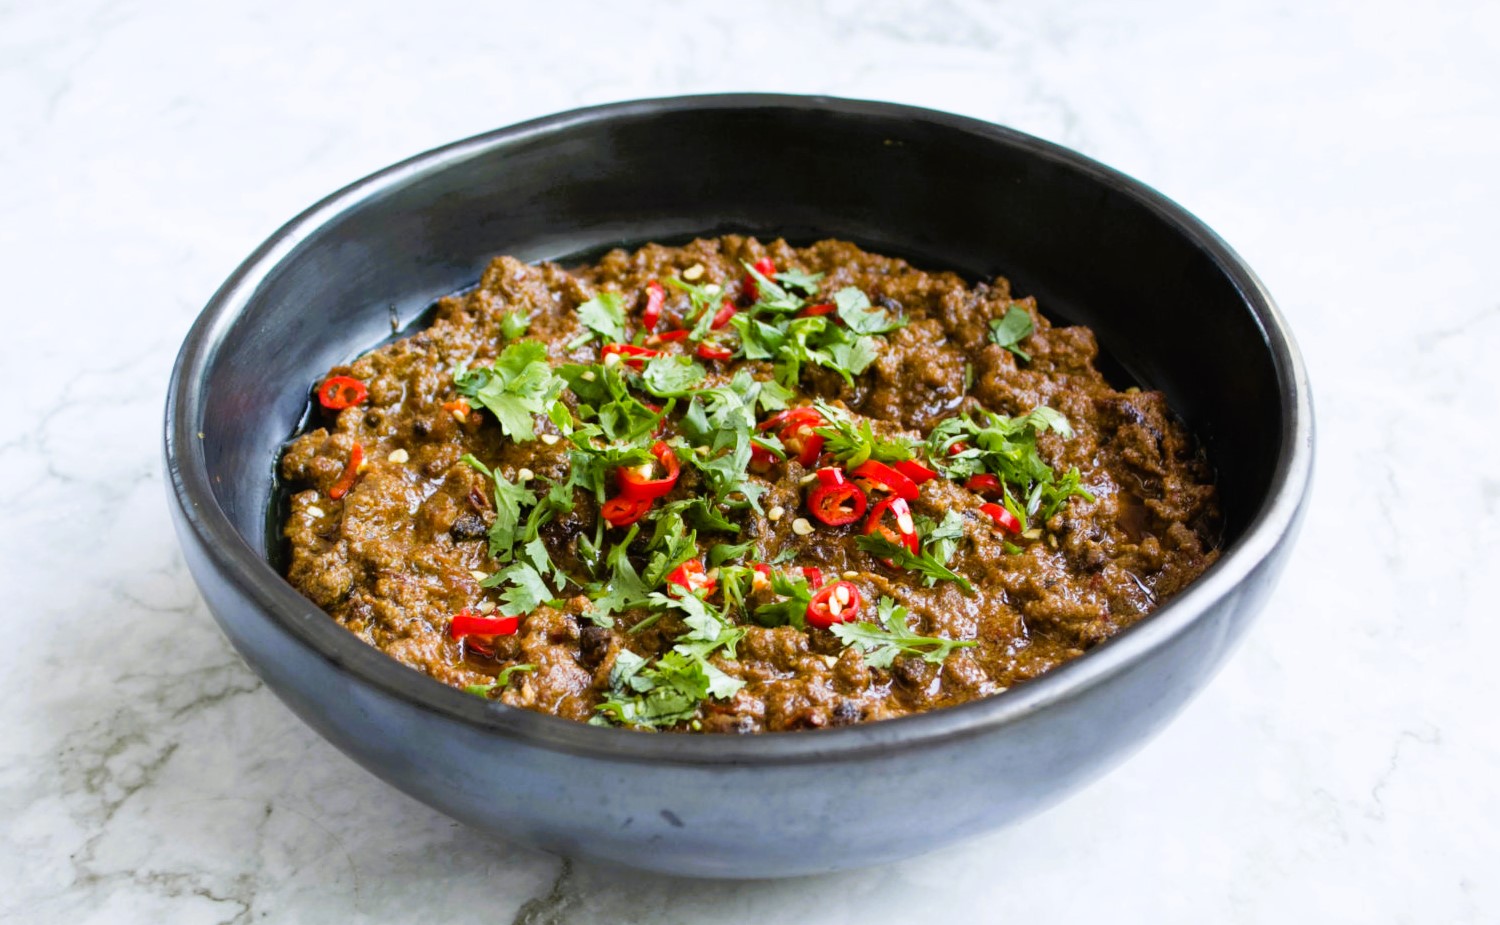
Fold in yogurt and stir continuously on medium-low heat for about 8 to 10 minutes until the oil begins to separate from the keema and you get the desired texture.
Remove from heat, place in serving platter and garnish with finely chopped cilantro and chilies. Serve with roti or plain basmati rice.
INGREDIENTS
½ cup neutral oil canola/sunflower/vegetable
1 teaspoon crushed garlic
2 pounds (~1 kg) whole chicken cut in small parts
2 teaspoon salt or to taste
1 medium yellow onion thinly sliced in half rings
2 teaspoon crushed ginger
1 teaspoon cumin powder
2 teaspoon coriander powder
1 tablespoon black pepper
½ cup full-fat yogurt
⅛ teaspoon garam masala powder for garnish (optional)
1- inch ginger julienned for garnish (optional)
2 bird's eye chiles thinly sliced for garnish (optional)
INSTRUCTIONS
Heat oil in a wok or karahi and add crushed garlic. Fry on low heat for 30 seconds or until fragrant.
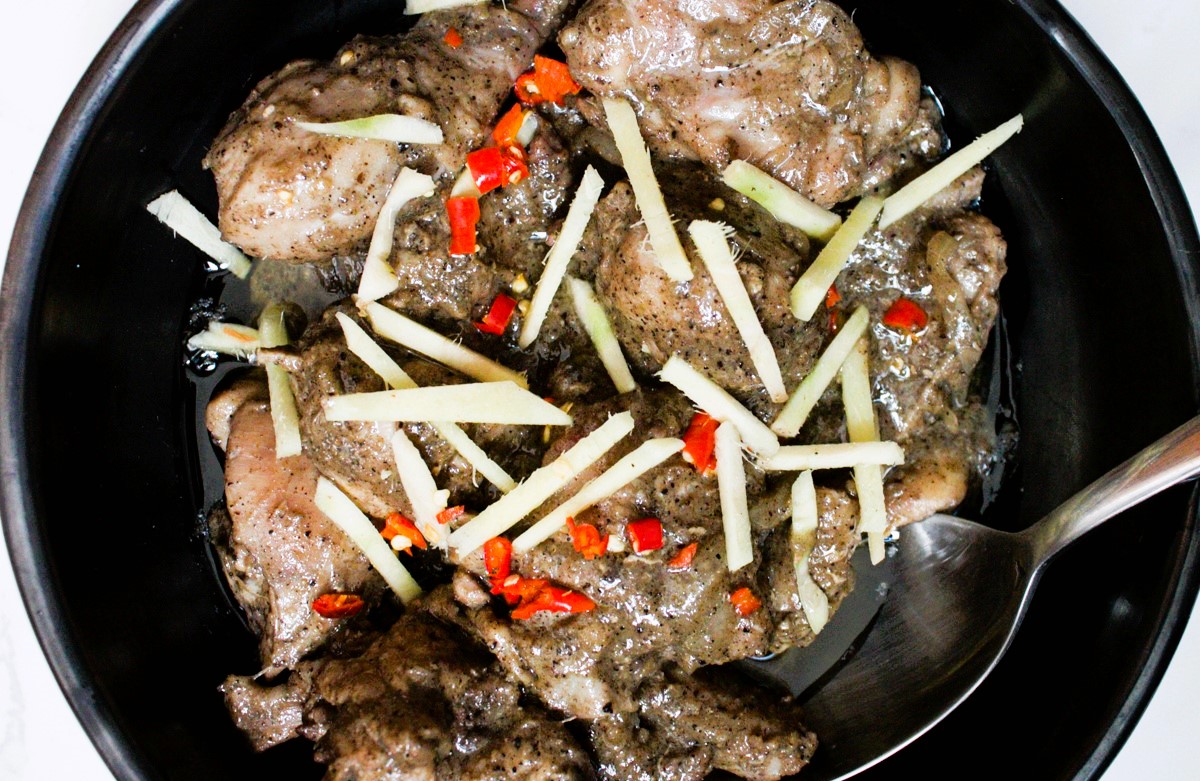
Increase heat to high, and add chicken and salt. Sear until no longer pink.
Add crushed ginger, sliced onion and ½ cup of water. Bring to boil, then lower to simmer. Cook uncovered until the chicken is tender and most of the water has evaporated, about 25-30 minutes.
Add yogurt, cumin powder, coriander powder and black pepper. Stir continuously on medium heat for about 5-7 minutes or until the chicken is well-coated in spices and the oil begins to separate from the dish.
Remove from heat. Garnish with julienned ginger, chili and a pinch of garam masala powder. Serve with roti or naan.
NOTE:
Feel free to reduce the amount of oil used. I used a generous ½ cup because that way the dish hits closer to the roadside karahi flavor I love but it's perfectly fine to just use ⅓ or even ¼ cup of any neutral oil.
.jpg)
Carrot Halwa is a Pakistani sweet pudding made of red carrots. This popular recipe for the delicious dessert is especially favored during the winter months. Since it happens to be a personal favorite, I often make it for special occasions regardless of the season!
This recipe uses the traditional method of making the Carrot Halwa {Gajar ka Halwa}, but today there are many different ways to prepare it. Many people like to use the pressure cooker as it helps to quicken the cooking process.
I find that this slow cooked version has a richer creamier taste, but not everyone has that much time to spare. If you’re looking for an Instant Pot carrot Halwa you’re unfortunately in the wrong place, but if you want an authentic old-fashioned recipe then this is the spot!
INGREDIENTS
CARROTS
MILK
SUGAR
COOKING OIL
CARDAMOM
GARNISH
e.g slivered, almonds and chopped pistachios.
RECIPE
The list of ingredients is fairly short for this recipe and the technique is not very complex. The amount of cooking time is long simply because the carrots release a lot of water as they cook. Most of the time in the recipe is spent waiting for the liquid to dry up. The carrots are naturally sweet and this, mixed with the sugar and milk is what creates that perfect pudding like consistency this sweet treat is famous for.
BOILING THE CARROT MIXTURE
In the first stage of making the Halwa, the carrots are cooked along with the milk and sugar on a medium flame. It’s best to start out with carrots at room temperature as the mixture will reach a boiling point quicker this way.
It’s also best to use a large pan that is wide as this allows for evaporation of the liquid in less time.
As the liquid evaporates it may be necessary to adjust the heat and change settings to low medium heat and eventually even low heat. The Halwa requires slow cooking at this stage to allow the carrots to get cooked through and towards the end a low flame is required.
Stirring will also be necessary at regular intervals to ensure that the mixture doesn’t stick to the bottom of the pan.
The cooking time for this stage is about 1 hour depending on individual cooking conditions.
ROASTING THE HALWA
Once all of the liquid has evaporated, it's time to start roasting the Halwa. Heat your Ghee or Oil, Sauté the cardamom and start roasting the reduced carrot mixture. Make sure to use a heavy bottom pan at this point so the Halwa doesn’t stick to the bottom as the sugar starts caramelizing. This can cause the Halwa to turn black due to charring and also alter the taste.
Roast for a good 15-20 minutes till the carrots bind together and turn a deep rich red. Then add in the remaining cardamom, garnish with the dry fruits of your choice and serve.
STORAGE & REHEATING THE HALWA
The Halwa will stay ok in the fridge for 3-4 days and in the freezer for 3-4 weeks. I know many sources state that the Halwa can stay in the freezer for up to 3 months but in my personal opinion after about a month it doesn’t taste as fresh.
For reheating, I would microwave the halwa in 30 second increments till it reaches the desired temperature. Defrost the halwa first if it was in the freezer and then follow the same instructions.
If you wish to reheat the halwa in a large quantity, put it in a serving dish, cover with foil and place it in a preheated oven. The temperature should be 350 degrees Fahrenheit and the reheating time should be 20-30 minutes.
If you are serving this at a large gathering, heat it for 20 minutes, at the temperature above, then turn the oven off and leave it inside to keep warm.
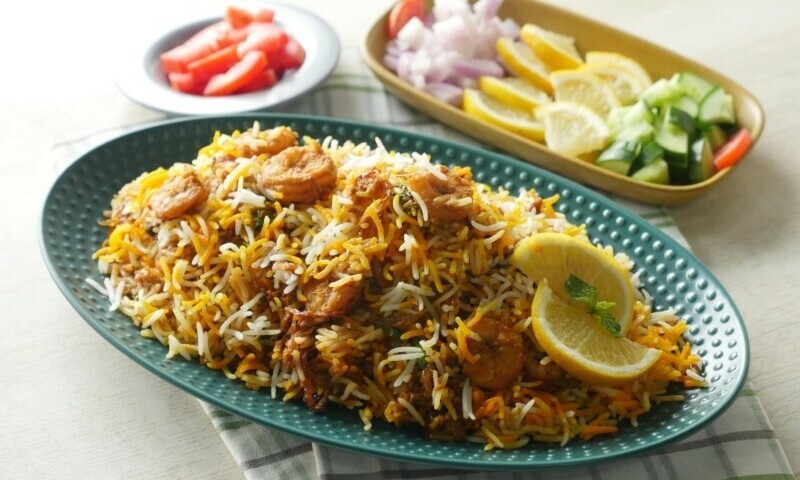
جھینگا بریانی ایک لذیذ اور توانائی بخش پکوان ہے جو بیشتر گھروں میں روزانہ رات کے کھانے یا لنچ کے وقت تیار کیا جاتا ہے۔
اسے بنانے میں آپ کو تھوڑی محنت کی ضرورت ہوگی لیکن یہ منفرد اور لاجواب ڈش ذائقوں سے بھری ہوتی ہے، 4 سے 5 لوگوں کے جھینگا بریانی بنانے کے لیے نیچے دی ہوئی ترکیب پر عمل کریں:
اجزا:
کھانا پکانے کا تیل آدھا کپ
کالی الائچی 1
ہری الائچی 2
دارچینی 1
کالی مرچ کے دانے آدھا چائے کا چمچ
بادیان کا پھول 1
لونگ 3-4
تیز پتے 2
زیرہ آدھا چمچ
ادرک لہسن کا پیسٹ 1 چمچ
ہری مرچ 1 چمچ پسی ہوئی
ٹماٹر پیس کر 3 درمیانہ
پیپریکا پاؤڈر 1 چمچ
نمک آدھا چمچ یا حسب ذائقہ
ہلدی پاؤڈر 1 چائے کا چمچ
دھنیا پاؤڈر آدھا چمچ
زیرہ بھنا اور پسا ہوا 1 چمچ
دہی 1 کپ پھینٹ لیں
پیاز تلی ہوئی آدھا کپ
جھینگے آدھا کلو
گرم مصالحہ پاؤڈر 1 چائے کا چمچ
چاول 2 کپ (بھیگے اور ابالیں)
پیاز تلی ہوئی مٹھی بھر
تازہ دھنیا ¼ کپ
زردے کا رنگ ½ چائے کا چمچ + پانی 1 چمچ
ترکیب:
برتن میں کوکنگ آئل، کالی الائچی، ہری الائچی، دار چینی، کالی مرچ، بادیان کا پھول، لونگ، تیز پتے، زیرہ ڈال کر اچھی طرح مکس کریں۔
ادرک لہسن کا پیسٹ، ہری مرچیں ، پیسے ہوئے ٹماٹر ڈال کر اچھی طرح مکس کریں۔
اب اس میں پیپریکا پاؤڈر، نمک، ہلدی پاؤڈر، دھنیا پاؤڈر اور زیرہ ڈال کر اچھی طرح مکس کریں اور 5 منٹ تک پکائیں۔
پھر دہی، تلی ہوئی پیاز ڈالیں، مکس کریں اور 2-3 منٹ تک پکائیں۔
اب جھینگے شامل کریں اور اچھی طرح مکس کریں۔
ڈھک کر ہلکی آنچ پر 3-4 منٹ تک پکائیں پھر تیل الگ ہونے تک پکائیں۔
گرم مصالحہ پاؤڈر شامل کریں، اچھی طرح مکس کریں اور ایک طرف رکھ دیں۔
اب دوسرے برتن میں آدھی مقدار میں ابلے ہوئے چاول، تلی ہوئی پیاز، جھینگے کا مصالحہ، تازہ دھنیا، باقی ابلے ہوئے چاول، زردے کا رنگ اور تلی ہوئی پیاز شامل کریں۔
ڈھک کر بھاپ میں ہلکی آنچ پر 6-8 منٹ تک پکائیں اور سرو کریں!
مزے دار جھینگا بریانی تیار ہے۔
This Balochi Tikka Karahi is the epitome of fusion like Tikka cut wedded with Karahi masala and fried spices; a recipe to absolute deliciousness in every bite. This is a typical Balochi style Karahi served on Dhabas near the highway.
Now, if you don't know what is Balochi? The people of Balochistan, a province of Pakistan are called Balochi. Balochi famous food includes sajji, dumpukht, kaak (stone bread), and roosh. All of these foods are delightful for any meat lover.
HOW TO MAKE IT?
For Balochi tikka karahi spice mix is essential! Like always, you switch powdered spices for whole ones. If you do not have these spices and you survive on ready-made spice mixes. Try mixing 2 tablespoons of karahi masala and 1 tablespoon of tikka masala to achieve a similar taste.
To make Balochi Karahi masala roast whole spices for about 1 minute then remove from heat.
Add the powdered spices and mix well.
Grind into a powder in a grinder.
Baluchi Karahi masala is ready. The masala stays good for months so you can double or triple the measure and make more masala for your next use.
Mix 1 cup water and 1 teaspoon salt in a large bowl. Add chicken and brine for 20 minutes. (Salty water is called brine.)
Now place soaked chicken along with brine water in a Karahi or wok and add enough oil to dip the chicken completely. Cook on high heat for about 20 minutes. Stir at intervals.
After cooking for 15 minutes on high heat, the color of the chicken will change to white. At this stage add the ginger and garlic.
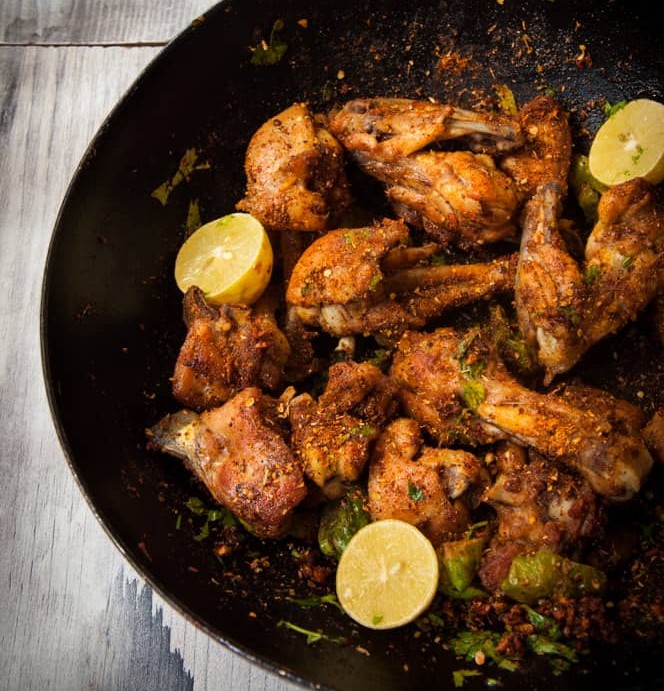
First, the water will evaporate and simultaneously the chicken will cook. When most water has dried and added slitted green chilies. (Tip: Slitting chilies is important as chilies tend to burst upon frying and can cause burns.) Cook for 5-10 minutes until the chicken is light golden.
Remember the chicken will get crisper as it cools so a few light golden spots are good. Strain the chicken and fried ginger and garlic. You can see the ginger and garlic has turned lovely.
Add prepared spices mix, lemon juice, and fresh coriander. Mix well and cover. Let chicken tikka karahi sit for 5 minutes so it absorbs the flavor. Then serve!
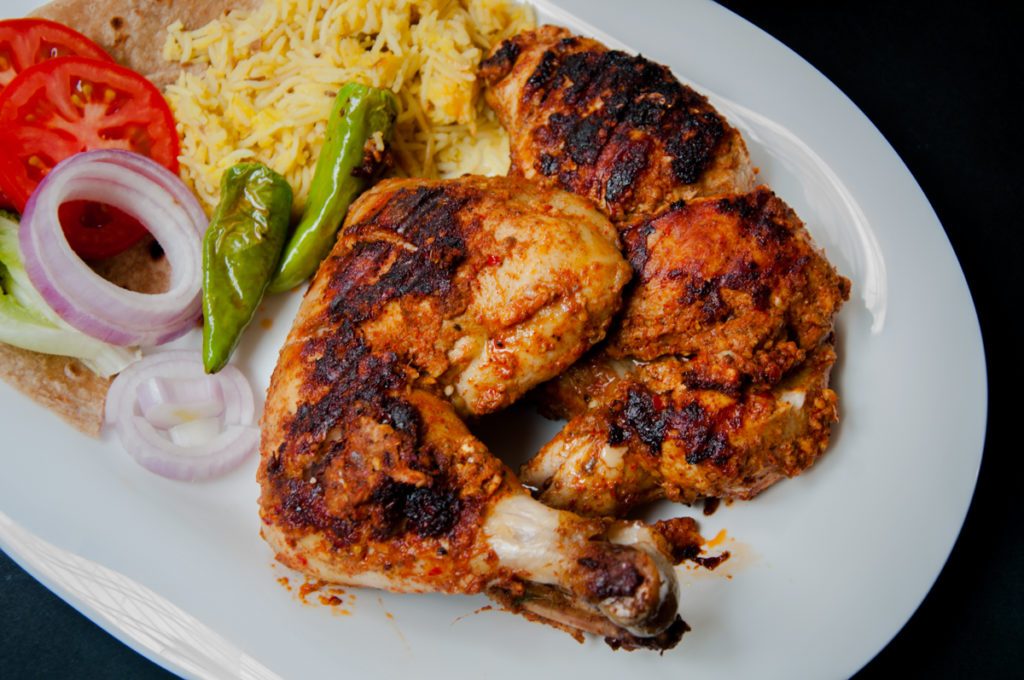
Ready for a smokey succulent authentic Pakistani chicken tikka? It tastes just like a restaurant and as if just coming off the barbecue pit. Marinate tikka ahead and cook it within 25 minutes!
INGREDIENTS
Chicken: Use medium-sized chicken pieces that weigh 750 grams. (Live chicken weighs 1-1.25 kg) Smaller chicken has tender meat. The bigger bird would require longer marination of at least 8 hours.
Wet spices: The wet spices are ginger, garlic, green chili, and papaya paste on the round plate. Papaya paste is used as a meat tenderizer.
Common Indian spices: Tikka doesn't require tons of spices like achari chicken. The dry spices are common Indian spices like cumin, coriander, turmeric, garam masala, salt, red chili flakes, and Kashmiri chili powder.
Kashmiri chili has a bright red color and a moderately spicy taste. You can substitute Kashmiri chili powder with paprika, and extra chili powder.
Yogurt: Yogurt adds a little tanginess and is also a meat tenderizer.
Lemon: Lemon helps with the tanginess.
HOW TO MAKE IT?
CHICKEN TIKKA ON THE STOVETOP
Soak chicken in vinegar and salt solution for 20 minutes. Pro Tip: This helps clean the chicken and removes the blood in the chicken leg. You can read more about washing chicken on Cookist.com.
Wash the chicken thoroughly after soaking and pat dry. Now, pierce the chicken with a fork. Then insert deep cuts across the grain. The cuts should be deep and the knife should touch the bone of the chicken.
Mix all the ingredients of marination in a bowl.
Apply all over the chicken and marinate overnight in the fridge. Or keep for 4-6 hours at room temperature in a cool place. Cover the pot with mesh or thin cloth to allow air circulation if kept out of the fridge.
Cook tikka in a wide pot on medium-high heat for 10-15 minutes. Cover the pot while cooking. Then burn excess water on high heat.
Pro Tip 1: Do not overcook tikka, the meat shouldn't come off the bones. If the tikka is fully cooked and there is still water left in the masala.
Remove chicken pieces and keep them on a separate plate. Then burn excess water on high heat. Apply the dry masala over the chicken but do not overdo it.
Pro Tip 2: If you have any excess masala save it to make chicken tikka both or chicken tikka masala or add it to any sauce.
To smoke: Place tikka in a wide pot with a tight lid. Put a piece of foil or a small metal bowl in the center of the pot. Now, heat charcoal on high flame until red hot then transfer coal carefully with the help of tongs to a pan. Drizzle little oil over the coal and cover the lid tightly to trap the smoke. Smoke for 7-10 minutes. Now heat the smoked tikka on the direct flame until crispy and serve. Or alternatively, you can grill tikka will little oil on a grill pan until slightly crispy. Grill on low heat.
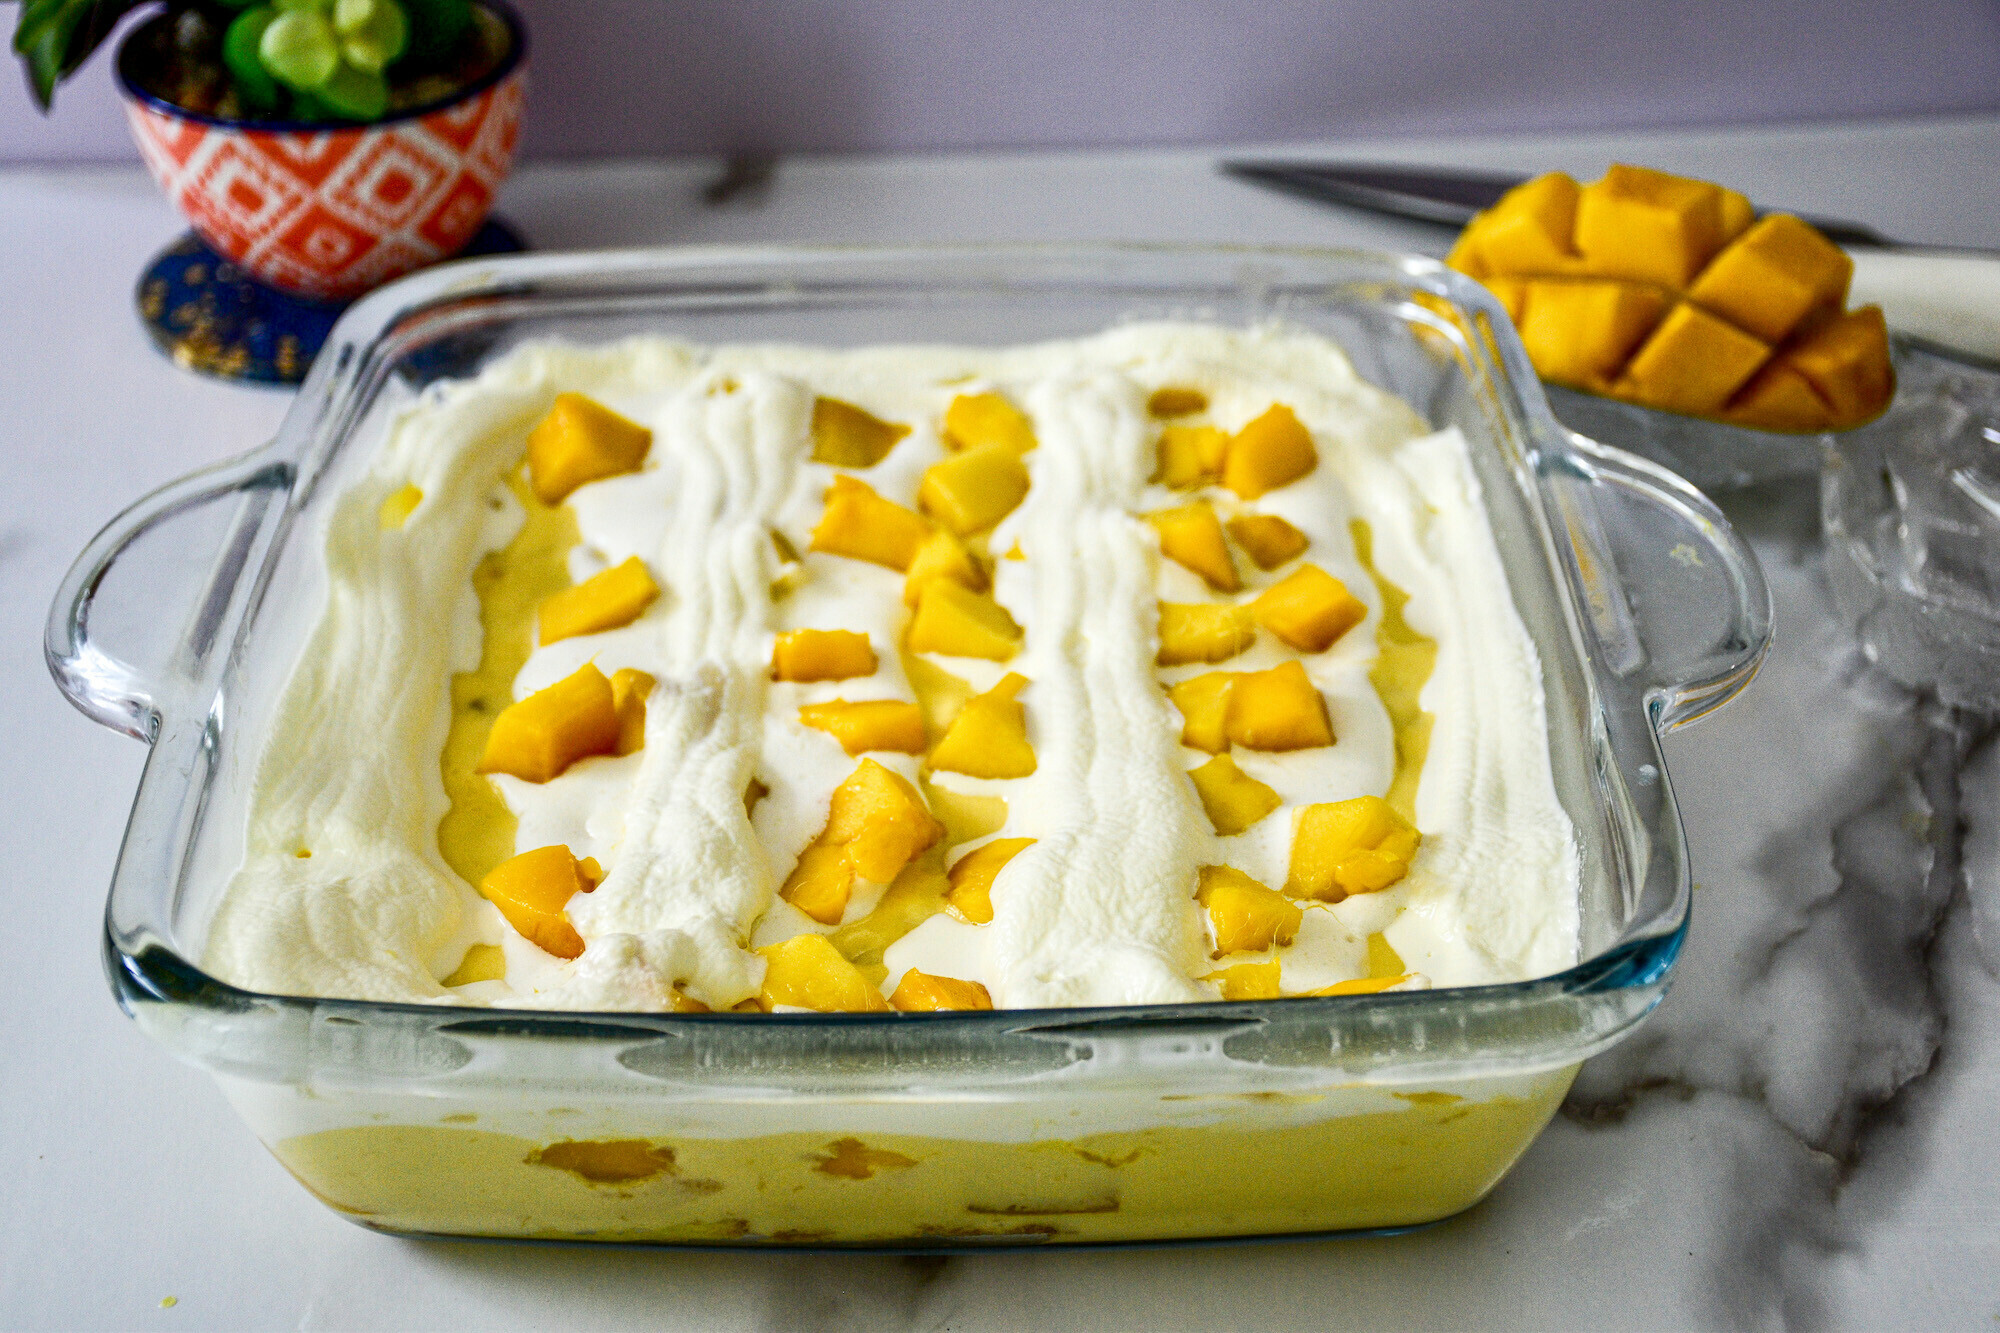
Ingredients
1 cup mango pieces
1 cup mango pulp
1 packet (200g) cream
1/4 cup milk
1/2 can (100g) condensed milk, or to taste
Vanilla cake slices
Method
Add a couple of tablespoons of condensed milk in milk, stir and keep aside.
Blend the mango pulp into puree. Keep aside.
Beat cream; add the mango pulp and the remaining condensed milk. Mix well with hand or electric beater.
At this point, taste the cream mixture for sweetness, and add more condensed milk if needed, since the sweetness of mangoes vary according to their types.
Take a serving dish, layer the bottom with cake slices, and pour the milk and condensed milk mixture over it to moisten the cake. Pour a layer of the mango cream mixture, saving half for the top layer.
Places the mango pieces over this cream layer, and then top with the remaining cream. Decorate the top in any way that pleases you — I simply used some mango chunks and cream.
Note: Jelly, nuts and other things can also be added in the layers, the choice depends on your taste buds.
I have kept the recipe very simple and straightforward, needing just some fruit cutting and mixing. Why cook in this heat when something so delightful can be whipped up, literally, in minutes!